FixYourVPN
If your VPN is running but a streaming service is still blocking you, a DNS leak is one of the most common culprits. It happens when your device quietly sends location requests outside the VPN, so sites can still see where you really are even though your IP address looks fine. The good news is it's usually a one-setting fix.
What DNS actually is
Every time you type a web address like netflix.com into your browser, your device needs to find the actual server that hosts that site. DNS (the Domain Name System) is the directory that translates human-readable names into the server addresses your computer actually uses. Think of it like a phone book: the website name is the person's name, and the DNS server looks up the number.
Normally, your internet provider runs the DNS servers your device uses. This means your internet provider can see every site you visit, even if they can't read the content. When you use a VPN, your DNS requests should go through the VPN's own servers instead, keeping them hidden from your internet provider.
What a DNS leak is
A DNS leak happens when your device sends DNS requests outside the VPN, directly to your internet provider's servers, even though your other traffic is going through the VPN. From the outside, your IP address looks like it belongs to the VPN server, but your DNS requests are coming from your home location.
Some streaming services check both your IP address and your DNS requests. If your IP says you're in the Netherlands but your DNS requests are coming from a Virgin Media server in Birmingham, the service can tell something is off and block you.
A DNS leak also affects your privacy more broadly, since your internet provider can still see which sites you're visiting even with the VPN running.
How to test for a DNS leak
The test takes about 30 seconds. With your VPN connected:
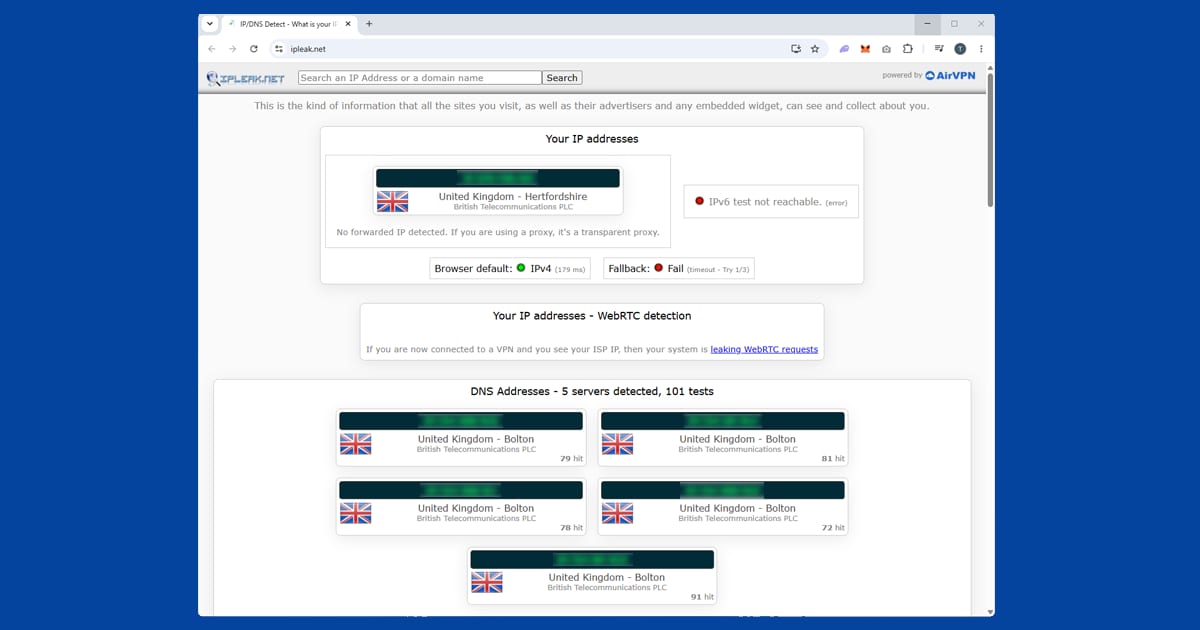
- Go to ipleak.net, a free DNS leak test tool.
- Run the extended test.
- Look at the results. The only DNS servers listed should belong to your VPN provider. Their name and location should match your VPN, not your home internet provider.
If the results show your home internet provider (Virgin Media, BT, Sky, or another provider) alongside or instead of your VPN, you have a DNS leak.
You can also use our IP address checker to confirm your VPN is masking your IP correctly. If it shows your home country rather than your VPN's location, the VPN connection itself may not be working properly.
How to fix a DNS leak
For most people, it's a single toggle inside the VPN app:
Enable DNS leak protection. In NordVPN, look in Settings for a DNS leak protection option. In ExpressVPN, DNS protection is handled automatically when you connect and there's nothing to change. In PureVPN, check under Settings for an Internet Security or Privacy section. Turn it on, reconnect your VPN, and run the leak test again.
Most DNS leaks are fixed with a single setting. Enable DNS leak protection in your VPN app, reconnect, and run the test again.
If your VPN doesn't have a leak protection setting, or if enabling it doesn't resolve the leak, you can manually set your DNS servers. This is more technical and most people won't need it, but it works:
- On Windows: go to Network & Internet Settings and look for DNS server settings in your network adapter properties. The exact path varies depending on your Windows version. Enter DNS server addresses from your VPN provider's support documentation.
- On macOS: System Settings > Network > select your connection > Details > DNS. Add the servers there.
- On iOS/Android: your VPN app should handle this automatically. If you're still leaking on mobile, reinstall the VPN app and make sure it has the permissions it needs to modify your network settings.
One thing worth checking on Android specifically: if you have a Private DNS provider set manually (under Settings > Network & internet > Private DNS), it can sometimes override your VPN's own DNS routing on certain Android versions. If you've enabled your VPN's built-in leak protection and you're still leaking, set Private DNS to "Automatic" or off, then test again.
What about DNS over HTTPS?
Browsers have their own DNS option called DNS over HTTPS (DoH), which encrypts DNS requests at the browser level. Chrome, Firefox, Safari, and Edge all support it. It's a useful privacy layer, but it's separate from your VPN's DNS leak protection and doesn't replace it.
If your VPN is leaking DNS, enabling DoH in your browser won't fix streaming issues, because streaming apps don't go through the browser's DNS settings. Fix the VPN leak first.
IPv6 leaks: worth checking at the same time
Most leak test tools also check for IPv6 leaks. IPv6 is the newer version of the internet address system, and some VPNs that handle standard IPv4 traffic correctly don't always cover IPv6.
If the test shows an IPv6 address belonging to your internet provider, look for an IPv6 leak protection setting in your VPN app. Most modern VPNs include this. If yours doesn't, you can disable IPv6 on your device entirely through your network settings on both Windows and macOS.
Which DNS leak test should I use?
ipleak.net is the one we usually point people to because it's quick and free, but it's not the only option. dnsleaktest.com is another well-regarded free tool that works the same way: run it with your VPN connected and check whether your own internet provider shows up anywhere in the results.
If you want to be extra thorough, running the test on two different sites and getting the same result on both rules out a fluke or a temporary glitch with one particular tool.
Split tunnelling can look like a leak but isn't one
If you've set up split tunnelling to deliberately exclude certain apps or sites from the VPN, those excluded apps will show your real DNS and IP address, and that's expected behaviour, not a leak. A genuine DNS leak happens when traffic that's supposed to be going through the VPN sneaks out anyway.
Before assuming you have a leak, double-check your split tunnelling settings to make sure the app or browser you're testing with isn't deliberately excluded from the tunnel.
Router-level VPNs and DNS leaks
If you've set your VPN up on your router so it covers your whole home network, DNS leak protection works a little differently, since there's no app running on each individual device to manage it. The router itself needs to be configured to use your VPN provider's DNS servers rather than your internet provider's default ones.
This is usually handled during the router VPN setup process, but it's worth checking your router's DNS settings directly if a leak test gives you a result that doesn't match what you'd expect. Router firmware varies a lot between manufacturers, so the exact menu location isn't something we can give one universal answer for; your VPN provider's own router setup guide is the most reliable source for this.
Encrypted Client Hello explained
Fixing a DNS leak closes one gap, but there's another small clue most people have never heard of. When your browser opens a secure connection to a website, it starts with a short greeting called the Client Hello. Traditionally, that greeting included the website's name in plain text, so anyone watching your connection, such as your wi-fi provider, could see which site you were visiting even though the page itself was encrypted.
Encrypted Client Hello, or ECH, hides that name. It became an official internet standard, RFC 9849, in March 2026. Firefox and Chrome both use ECH when secure DNS (DNS over HTTPS) is switched on and the website supports it, and Cloudflare turned it on for its customers back in 2023, so lots of sites already do.
Here's what that means in practice:
- ECH plus secure DNS hides more of your browsing from your local network and internet provider.
- It doesn't hide your IP address. Websites still see where you're connecting from.
- So it doesn't replace a VPN for streaming or for changing your location.
Think of ECH as a nice extra layer on top of a VPN that isn't leaking, not a substitute for one. After changing any DNS settings, run a quick check with our guide on how to check your VPN is working. More fixes live in our connection problems hub.